
To photograph the city, I don't start by looking for a monument. I first look at how the elements respond: a facade and a street, a roof line and a vehicle, a land and the surrounding buildings. I take a few seconds to choose where to place myself, what I want to keep in the frame and what I can leave out. These are simple decisions, but they change the story of the image.
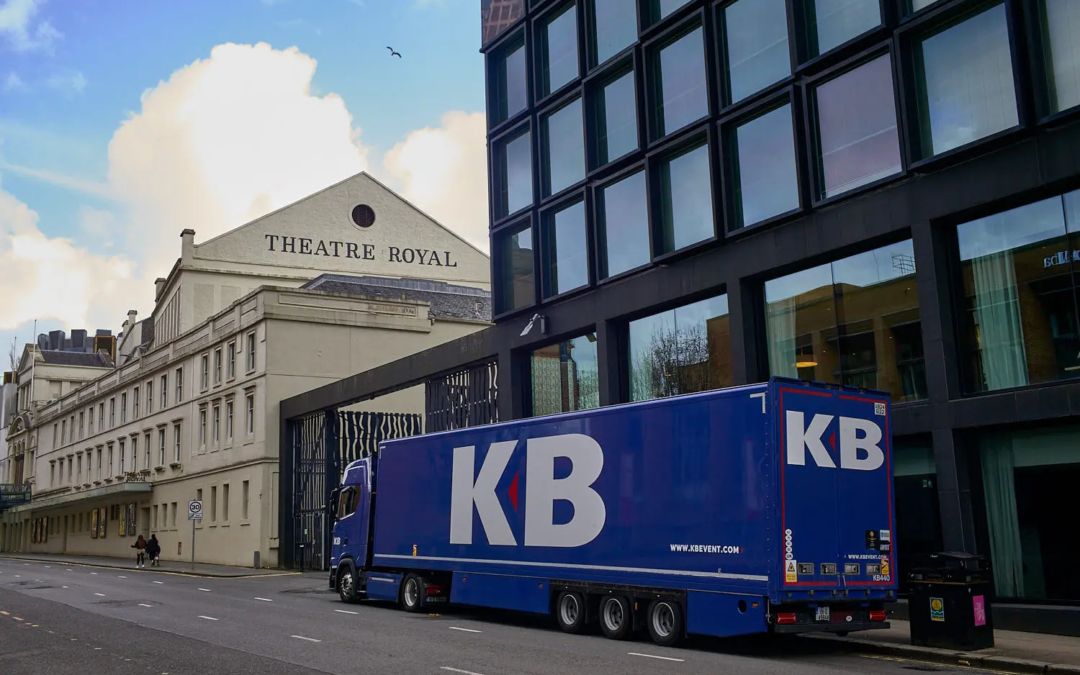
In Glasgow, I photographed a blue truck parked in front of the Theatre Royal. In Bayonne, a rugby field stopped in the middle of the city. These scenes don't look alike. Yet they have one thing in common: I did not treat them as postcards. I looked for a relationship between the place and what was going on there. In this guide, I share this method of terrain, with concrete leads to choose his point of view, work the lines, observe the light and build a small series.

How to photograph the city without just looking for the monument?
To photograph the city, first choose a scene that holds you back, then observe the relationships between its elements before triggering. Step back or move a few steps, check the edges of the frame and wait if the light or passage of people changes the composition. An ordinary subject can become interesting as soon as the viewpoint reveals how it fits into its neighbourhood.
A monument remains a legitimate subject. But it is not always enough to tell a place. A front, a bus stop, a palisade, a ground or a vehicle stop also give clues about how the city is lived. An urban image can even be built without anyone in the foreground. The uses remain visible in the traces, the furniture, the lines painted on the ground and the state of the facades.
Choose a subject before choosing its framing
When I stop in a street, I wonder what made me slow down. Is it a color that slices? A building that seems to respond to the one opposite? A shadow that cuts a facade? This first impression gives me direction. Then I look for what's really important in the scene and what might distract my eyes.
The subject does not need to be spectacular. In Bayonne, a rugby field m The white lines and the green surface are visible at first glance. Looking longer, you can also see the trees, fence, facilities and neighbourhood beyond. The sports venue ceases to be a simple field. It becomes a way of showing the uses of this urban space.

Try to name the subject in a few words before triggering: « front and truck », « land in the middle of trees », « the reflection in the window ». If you cannot identify what's stopping you, the frame may contain many elements without clear direction. This little break is not a strict rule. It is a means of verifying that the image meets an intention.
Getting around to find a better perspective
The first place where one sees a scene is not always the best. Decal left, right, move forward or back. A few steps movement can separate two overlapping shapes, open a window or change the place of the subject in the frame. I also check what is happening behind the subject, because a heavy bottom can weigh as much as a foreground too present.
On a large square or street, try a view up to the eyes, then a lower or slightly off view. These variations are not effects in themselves. They help to understand how lines and volumes change according to the photographer's position. If a car masks a facade, I can wait until it passes. If she is part of what interests me, I can instead leave her a place in the picture.
In narrow streets, facades often converge towards the bottom. Keep this perspective if it naturally attracts attention. But avoid placing an important line on the edge of the frame for no reason: a sidewalk edge or a steeply cut roof may give the impression that the image was framed too quickly. Check the four corners before triggering.
Use lines without closing the image
Streets, sidewalks, facades, railings and windows give strong lines to urban photography. They can guide the look to a point, separate the planes or create a rhythm. I spot them, but I'm not trying to make every image perfectly symmetrical. A slight irregularity can keep a scene alive.
In Glasgow, the street in front of the Theatre Royal combines ancient buildings with a contemporary façade. The verticals of this façade meet the horizontals of the truck and the carriageway. The look flows between the two architectures, then returns to the blue vehicle. It's not a geometry exercise. It's just a way to see that the lines already on the street organize the photo.
A reflection can add a second space in the frame. A window reflects the facades opposite, a bus or the sky, while allowing to see the interior of the trade. I then look for the angle where the reflection completes the subject rather than masking it. Again, a few steps are sometimes enough to transform a confused superposition into a legible image.
Choose a focal point and a distance that serve the scene
There is no mandatory focal point to photograph the city. A wide-angle lens keeps a street or a whole building in the frame, but it can distort the edges if it approaches much. A longer focal length helps to isolate a detail or visually connect to distant elements, but shows less environment. I first choose the distance and the relationship I want between the subject and its context, then the objective that allows me to return it.
If you're new, a goal you know is enough. Learn how it fits by moving around rather than constantly changing equipment. Make a wide picture, then get closer if the scene allows. A second tighter photograph can show what had first escaped you. Comparing these views helps to understand whether interest is in detail or in its environment.
In a busy street, keep the equipment simple and keep an eye on what surrounds you. The goal is not to produce a particular technical effect, but to remain available on stage. If a photograph depends on a brief moment, anticipate the direction of the movement and choose in advance what you want to keep clear in the frame.
Observe the light before adjusting the device
The light changes the atmosphere of a street and the readability of surfaces. A frontal light reveals the colors quite directly. A side light brings out the reliefs of a wall. The backlight can reduce a subject to a silhouette or give a presence in the sky, depending on the exposure chosen. I first look at where the light comes from and what parts of the scene it illuminates.
The full sun sometimes creates hard shadows, but it can also make a clear shape appear on a wall. A covered sky often gives a more diffuse light, useful when I want to preserve the nuances of a clear facade. I'm not trying to systematically avoid shadows. Instead, I check that they support the composition instead of cutting the subject accidentally.
To learn, make two images of the same scene at different times, if you can. The place will not have changed, but the contrasts, colors and silhouettes will be different. The device settings count, of course. But the habit of reading light often precedes the precise choice of speed, opening or sensitivity. A guide to street photography published by Adobe also evokes the importance of moment, light and angle of shooting.

Decide whether people should enter the image
An urban photograph does not need a human silhouette to talk about everyday life. A worn bench, open doors or traces of a passage can suggest a presence without showing anyone. At other times, a person gives a ladder to a building or creates a relationship between the foreground and the bottom.
I wonder what a person brings to the stage before letting it become the main subject. Does she give a ladder? Does his movement respond to the lines of the street? Does it distract the attention of a detail that is more interested? These are not moral answers. These are choices of composition and narrative.
In public space, we must also show respect. Do not block the passage to get an image. If a recognizable person is the central subject and the context lends itself, asking for his agreement may be the best option. Depending on the location and intended use of the image, the rules may vary. If there is any doubt about a commercial broadcast or a sensitive context, ask yourself rather than assume that a street photo can always be published without restriction.
Compose a scene in multiple planes
A city image sometimes gets deeper when it has a foreground, a subject in the middle and a background. A pole, window or vehicle can frame the scene. But these elements must not hide what you want to show. The foreground has a role: it brings the spectator closer, gives a scale or connects two parts of the place.
In the image of the Theatre Royal, the truck occupies a large part of the foreground. The theatre and the contemporary façade remain visible behind it. These elements are not all at the same distance. This superposition is precisely what gives the scene its tension. If the truck disappeared, the image would tell another street.
To practice, photograph the same place in three ways: with a visible foreground, without foreground, then dial only one detail. Then look which one best explains what you were interested in. There's not necessarily one good answer. Comparison makes your choices more conscious.
Build a photographic walk
To avoid photographing every street too quickly, I can give myself a simple theme for a walk: reflections, thresholds, sports grounds, the colours of a single family or the links between old and recent buildings. A tight set helps to look with more attention. It must not become an obligation to complete a series.
Sometimes I keep different images of the same place: a wide view, a detail and a passing scene. When I look at them together, I remove those that repeat exactly the same information. A small series must not show everything. It can simply offer several ways to enter a neighbourhood.
The notebook can be as simple as a note taken on the phone: street name, hour, light or what stopped. This helps to find the context later, especially if the image becomes a draw or joins a portfolio. For urban photography, the real context counts. He avoids giving a scene a story that the image does not allow to verify.
Photographing a real city, without making the scene
The framing always transforms what we see. Choosing for a moment, placing yourself on the left rather than on the right or excluding an element from the edge changes the reading. But this part of choice doesn't make it necessary to invent a scene. For my practice, I leave places that I actually photographed and what was there. I prefer to keep this difference clear when I tell an image.
A photograph can be worked on in development or printing, but its narrative should not attribute to absent elements. When a scene is ambiguous, I describe what I can establish: a street, a facade, a light, a shape. I leave the viewer the place to interpret the rest.
This look joins my article on the urban photography and how to look at the city. There, I speak more about the uses and subjects I encounter. Here I focus on practical gestures to choose the point of view and build the image. When a scene is held mainly by its forms and contrasts, I also explain how I approach it in my article on the street photo in black and white.
From street photography to print
When an image seems to me to hold, I also think about how it will be viewed elsewhere than on the screen. A photograph with multiple planes may require a size large enough to keep the details legible. A simpler subject can work in a modest size. The print does not change the photographed scene, but the reading distance can bring out other elements.
To choose a photograph to hang, I check what holds the look and the space available on the wall. The Fine Art photo print guide explains the benchmarks for understanding paper and support. The one on the framed photo print, format and frame details the presentation. The options available can vary according to each work, so I always refer to the precise drawing sheet. To have several images together, here is also the guide for compose a photo wall.
I do not choose an image to match an interior at any cost. I wonder if I want to see her again, if she keeps something to discover and if her format leaves her space. For photographs that are not hung, I also explain how to keep a photo print at home.
A simple method for your next exit
- Choose an area to browse. A street or a neighborhood is enough. You don't need to cover everything.
- Find out what's stopping you. A color, a shape, a use, a contrast between two buildings.
- Move. Try at least two points of view and check the edges of the frame.
- Look at the light. Note the clear areas, shadows and reflections before setting the device.
- Make several distances. A wide view, a closer view, then a detail if the scene lends itself.
- Wait a minute. A passage, movement or change of light may complement the image, but do not force the scene.
- Sort later. Keep images that add different information, not just those that are technically clear.
This course is not a recipe to succeed every shot. It's a way to slow down enough to see the choices. A good point of view is not always at first sight. Sometimes the fairest picture is the one that we make after looking a little longer.
Frequently asked questions about urban photography
What camera does it take to photograph the city?
A device you know how to use is enough, including a phone. The knowledge of framing and the ability to read light counts more than the accumulation of material. Start with a focus or a mode you master, then move to vary the frame.
How to make a street photo more interesting?
Find a visual relationship: a person facing a facade, a line leading to a subject, a colour contrast or a reflection that adds a second plane. Move and check the edges of the frame before triggering. An ordinary scene may suffice if its composition is clear.
Should passersby always be included in an urban photograph?
No. Buildings, streets and signs of use also tell the life of a place. A person can give a scale or movement, but it is not indispensable to each image.
What time do you choose to photograph the city?
There is no universal time. A low light can lengthen the shadows, while a covered sky gives a softer light. The right time depends on the stage and the desired effect. If possible, come back to the same place at another time to compare.
What difference between urban photography and street photography?
Both overlap. Street photography often attaches to people and moments seized in public space. Urban photography also includes buildings, uses, infrastructure and details of a place, even in the absence of passers-by. The difference mainly depends on what the photographer chooses to observe.
Continue the walk
To photograph the city is to learn to choose without believing that there is a single right framing. You can approach a facade or keep the whole street. We can wait for a silhouette or prefer the traces she left. In Glasgow, a truck in front of a theatre made you want to keep together several periods and functions of the city. In Bayonne, a rugby plot of land made the public space look through its uses.
To see how these images fit into real walks, you can browse my photographs of Glasgow and my images of Bayonne. And if you want to explore another side of urban photography, I also tell how I frame the painted walls and street art met in the street.